
Denoising autoencoder
Autoencoder là thuật toán unsupervised với đầu vào là image ban đầu và nó sẽ xây dựng lại ảnh ban đầu bằng cách sử dụng một số bits. Autoencoder nghe có vẻ giống image compression tuy nhiên khác với image compression thì trong autoencoder, compression được thực hiện bằng việc học trên dữ liệu ban đầu.
Autoencoder bao gồm 2 thành phần chính là:
- Encoder: Phần của mạng NN nén ảnh ban đầu về một số bits ít hơn. Không gia được biểu biễn bởi một số bits đó được gọi là latent-space (không gian ẩn) và điểm nén lớn nhất được gọi là bottleneck. Những bits nén ảnh ban đầu cũng được gọi là encoding của input image.
- Decoder: Phần của mạng NN tạo dựng lại input image bằng cách sử dụng encoding của image đó.
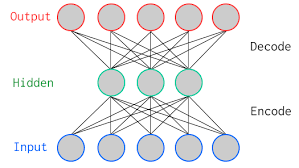
Hình trên biểu diễn một autoencoder đơn giản với 1 hidden layer. Input và output layers có cùng số neurons (do cần cùng biểu diễn một ảnh). Có một số loại autoencoder thường gặp như: sparse autoencoder, variational autoencoder, denoising autoencoder. Trong phần này chúng ta sẽ tìm hiểu về denoising autoencoder.
Denoising autoencoder
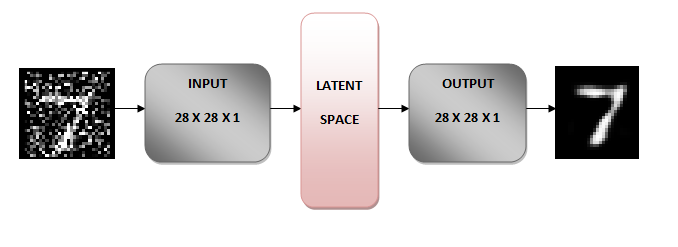
Ý tưởng đằng sau denoising autoencoder là học cách biểu diễn (latent space) được tăng cường bởi noise. Chúng ta add noise vào ảnh ban đầu sau đó cho ảnh có noise làm input của mạng NN.
Phần encoder sẽ chuyển ảnh thành về không gian khác mà vẫn lưu được các đặc điểm chính của ảnh ban đầu nhưng loại bỏ noise (ở đây sẽ dùng handwritten digits). Phần bên dưới chúng ta chuyển ảnh có kích thước 28x28x về 7x7x32 (latent space).
Phần decoder của mạng NN sẽ tái tạo là ảnh gốc ban đầu từ 7x7x32 và không còn các noise. Để làm được điều này trong quá trình training chúng ta định nghĩa loss function để minimize sự khác nhau giữa ảnh được tái tạo và ảnh ban đầu không có noise. Nói cách khác chúng ta học 7x7x32 space không có noise.
Dễ hiểu hơn thì original image + noise qua encoder được latent-space. Latent space đi qua decoder nhận được original image. Như vậy thông qua pretrained denoising autoencoder chúng ta có thể loại bỏ bớt noise khỏi ảnh ban ban đầu.
Implementation of Denoising Autoencoder
Model architecture
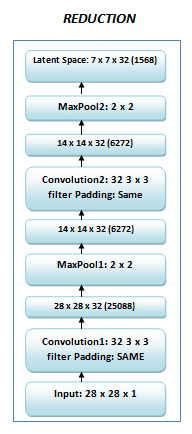
- Ảnh ban đầu có kích kích
28x28được chuyển thành28x28x1do sau đó dùng Conv2D layer. - Normalize image về đoạn [0, 1] sau đó cho image vào NN
- Encoder chuyển image về dạng
7x7x32(latent space).

Decoder làm điều ngược lại so với encoder từ latent space 7x7x32 nó chuyển về dạng 28x28x1.
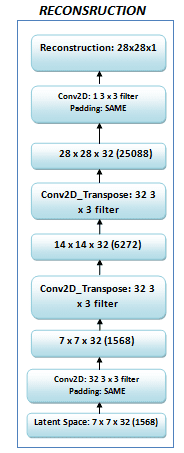

Chúng ta có thể thay thế Conv2DTransopse bằng Upsampling2D.
Từ đây chúng ta có thể xây dựng model cho denoising autoencoder. Thông qua denoising encoder này chúng ta hy vọng sẽ khôi phục lại ảnh bị noise ban đầu. Chúng ta có thể áp dụng Denoising Autoencoder cho bài toán OCR với vai trò preprocessing.
Đây là phần source code.
from tensorflow.keras.datasets import mnist
import numpy as np
import matplotlib.pyplot as plt
import tensorflow as tf
from tensorflow.keras import Model
from tensorflow.keras import layers

(x_train, _), (x_test, _) = mnist.load_data()

# normalize và reshape
x_train = x_train.astype('float32') / 255.
x_test = x_test.astype('float32') / 255.
x_train = np.reshape(x_train, (len(x_train), 28, 28, 1))
x_test = np.reshape(x_test, (len(x_test), 28, 28, 1))

# add noise vào ảnh
noise_factor = 0.5
x_train_noisy = x_train + noise_factor * np.random.normal(loc=0.0, scale=1.0, size=x_train.shape)   # size đúng với x_train để kớp
x_test_noisy = x_test + noise_factor * np.random.normal(loc=0.0, scale=1.0, size=x_test.shape)

# clip, giá trị nào lớn hơn 1 cho về 1, nhỏ hơn 0 cho về 0
x_train_noisy = np.clip(x_train_noisy, 0., 1.)
x_test_noisy = np.clip(x_test_noisy, 0., 1.)

# hiển thị một số ảnh
n = 10
plt.figure(figsize=(20,2))
for i in range(1, n + 1):
    ax = plt.subplot(1, n, i)
    plt.imshow(x_test_noisy[i].reshape(28, 28))     # ảnh bị normalize về [0, 1] mà vẫn hiển thị nhỉ
    plt.gray()
    ax.get_xaxis().set_visible(False)
    ax.get_yaxis().set_visible(False)
plt.show()

# Xay dung model
input_img = layers.Input(shape=(28, 28, 1))

x = layers.Conv2D(32, (3, 3), activation='relu', padding='same')(input_img)
x = layers.MaxPooling2D((2, 2), padding='same')(x)
x = layers.Conv2D(32, (3, 3), activation='relu', padding='same')(x)
encoded = layers.MaxPooling2D((2, 2), padding='same')(x)

# At this point the representation is (7, 7, 32)
# Decoder y hệt như encoder nhưng theo hướng ngược lại
# Có thể dùng Conv2DTranspose hoặc Upsampling2D

x = layers.Conv2D(32, (3, 3), activation='relu', padding='same')(encoded)
x = layers.UpSampling2D((2, 2))(x)
x = layers.Conv2D(32, (3, 3), activation='relu', padding='same')(x)
x = layers.UpSampling2D((2, 2))(x)
decoded = layers.Conv2D(1, (3, 3), activation='sigmoid', padding='same')(x)

autoencoder = Model(inputs=input_img, outputs=decoded)
autoencoder.compile(optimizer='adam', loss='binary_crossentropy')

autoencoder.summary()

NUM_EPOCHS = 20
BATCH_SIZE = 128

hist = autoencoder.fit(x_train_noisy, x_train,
                epochs=NUM_EPOCHS,
                batch_size=BATCH_SIZE,
                shuffle=True,
                validation_data=(x_test_noisy, x_test),
                callbacks=[tf.keras.callbacks.TensorBoard(log_dir='/tmp/tb', histogram_freq=0, write_graph=False)])

# funstion for train and val losses visualizations
def plot_losses(hist):
    plt.plot(np.arange(NUM_EPOCHS), hist.history['loss'], label='Training loss')
    plt.plot(np.arange(NUM_EPOCHS), hist.history['val_loss'],label='Validation loss')
    plt.title('Training and validation loss')
    plt.xlabel('Epochs')
    plt.ylabel('Loss')
    plt.legend()
    plt.show()
    plt.close()

# visualize train and val losses
plot_losses(hist)

"""## Kiểm tra lại"""

import numpy as np

img = x_test_noisy[5]
img = img[np.newaxis, ...]      # đúng shape(1, 28, 28, 1)

print(img.shape)
new_img = autoencoder.predict(img)

# post processing
new_img = new_img * 255
new_img = new_img.astype("uint8")   # trả về unsigned integer

plt.imshow(new_img.reshape(28, 28))     # reshape lại. Cái này để chính xác nên dùng tf.squeeze để dropout các axis cho chính xác
plt.show()
Các bạn có thể xem link tham khảo cuối cùng để xem cho tiện hơn.
Tài liệu tham khảo
- https://learnopencv.com/understanding-autoencoders-using-tensorflow-python/
- https://blog.keras.io/building-autoencoders-in-keras.html
- https://www.pyimagesearch.com/2020/02/24/denoising-autoencoders-with-keras-tensorflow-and-deep-learning/
- https://github.com/huytranvan2010/Sourcecode-huytranvan2010.github.io/blob/main/Denoising_autoencoder.ipynb